I'm always looking for a new twist on breakfast. I ran across this recipe while looking at the September/October 2016 issue of Eating Well, and thought these sounded easy and amazing. I whipped them up this morning for breakfast in less than 20 minutes, and they were delicious! I used an herbed butter to top these waffles, but they probably didn't even need that. They were a little salty, a little smoky, and a lot delicious. They are also entirely gluten free, which is a bonus if you've got someone in your house who can't eat gluten (do pay attention to the shredded potatoes you're using if they are pre-packaged to ensure they don't have any gluten added). My mind is racing with all sorts of fun variations you can do with this basic recipe. This one has gone into the permanent files.
Ham and Gruyere Hash Brown Waffles
Ingredients:
3 large eggs
2 tablespoons extra-virgin olive oil
3 cloves garlic, finely chopped
1 tablespoon minced fresh chives or 1 teaspoon dried
1/4 teaspoon ground pepper
20 ounces frozen shredded hash browns (about 7 cups), thawed or a 20-ounce bag of fresh shredded potatoes
1 cup diced ham
1 cup shredded Gruyère cheese
1. Preheat a classic waffle iron to medium-high.
2. Whisk eggs, oil, garlic, chives and pepper in a large bowl.
3. Place hash browns in the center of a clean kitchen towel. Gather up the edges of the towel and twist and squeeze to wring out excess moisture from the hash browns. Stir the hash browns, ham and cheese into the egg mixture. *NOTE: If you using the fresh shredded potatoes, you can skip the squeezing step.*
4. Coat the waffle iron with cooking spray. Use a generous 1 cup of the mixture per waffle and cook until browned and crispy, about 5 minutes each.
Showing posts with label Eggs. Show all posts
Monday, September 5, 2016
Saturday, March 8, 2014
Baked Eggs in Prosciutto-Hash Brown Cups
My Eating Well magazine had a little spread this month about things you can make in your muffin tins that aren't exactly muffins. This one caught my eye...I mean, the egg is front and center, so I had to try them out. This recipe is delicious and pretty easy, BUT, it destroyed my already dying muffin tin. I highly, highly recommend either having a newer muffin tin (non stick) or using like a silicon baking cup...these can make a mess, despite the amount of oil or spray you use to cause them to not stick. I may have to try another method next time, but these are delicious. The egg is runny, but cooked, the prosciutto crisps up, and I mixed sweet potatoes with regular potatoes to add a little more fiber and vitamins. Two of these little guys make a perfect breakfast.
Baked Eggs in Prosciutto-Hash Brown Cups (inspired by Eating Well magazine)
Ingredients:
Canola or olive oil cooking spray
4 cups frozen shredded hash browns, fully thawed
2 cups shredded sweet potato
3 tablespoons extra-virgin olive oil
1 teaspoon chopped fresh rosemary or 1/4 teaspoon dried
1/2 teaspoon paprika
1/2 teaspoon freshly ground pepper
1/4 teaspoon salt
6 thin slices prosciutto (about 3 ounces), halved crosswise
12 large eggs, at room temperature (see Tips)
3 tablespoons chopped fresh chives
1. Preheat oven to 375°F. Generously coat a 12-cup nonstick muffin tin with cooking spray.
2. Put hash browns in a clean kitchen towel; working over the sink, squeeze and wring the towel to remove as much liquid from the hash browns as possible. Transfer to a large bowl; stir in oil, rosemary, paprika, pepper and salt until combined. Divide the mixture among the muffin cups (about 1/3 cup each), then press into the bottom and up the sides of each cup to form a “nest.” (There should be a solid layer in the bottom of the cup, but it’s OK if the hash browns don’t go completely up the sides.) Generously coat the hash browns with cooking spray.
3. Bake the hash brown nests until golden brown on the bottom and edges, about 30 minutes.
4. Lay 1 piece of prosciutto into each hash brown nest, letting it overhang the edges. One at a time, crack an egg into a small bowl and slip it into a nest. (It’s OK if some of the egg white spills over.)
5. Bake, rotating the pan front to back halfway through, until the eggs are cooked to desired doneness, 10 to 15 minutes for medium set or 15 to 18 minutes for hard set. Let cool in the pan for 5 minutes. Run a butter knife around the edges of each nest a few times to loosen completely, then use the knife to lift them out of the tin. Serve sprinkled with chives.
Baked Eggs in Prosciutto-Hash Brown Cups (inspired by Eating Well magazine)
Ingredients:
Canola or olive oil cooking spray
4 cups frozen shredded hash browns, fully thawed
2 cups shredded sweet potato
3 tablespoons extra-virgin olive oil
1 teaspoon chopped fresh rosemary or 1/4 teaspoon dried
1/2 teaspoon paprika
1/2 teaspoon freshly ground pepper
1/4 teaspoon salt
6 thin slices prosciutto (about 3 ounces), halved crosswise
12 large eggs, at room temperature (see Tips)
3 tablespoons chopped fresh chives
1. Preheat oven to 375°F. Generously coat a 12-cup nonstick muffin tin with cooking spray.
2. Put hash browns in a clean kitchen towel; working over the sink, squeeze and wring the towel to remove as much liquid from the hash browns as possible. Transfer to a large bowl; stir in oil, rosemary, paprika, pepper and salt until combined. Divide the mixture among the muffin cups (about 1/3 cup each), then press into the bottom and up the sides of each cup to form a “nest.” (There should be a solid layer in the bottom of the cup, but it’s OK if the hash browns don’t go completely up the sides.) Generously coat the hash browns with cooking spray.
3. Bake the hash brown nests until golden brown on the bottom and edges, about 30 minutes.
4. Lay 1 piece of prosciutto into each hash brown nest, letting it overhang the edges. One at a time, crack an egg into a small bowl and slip it into a nest. (It’s OK if some of the egg white spills over.)
5. Bake, rotating the pan front to back halfway through, until the eggs are cooked to desired doneness, 10 to 15 minutes for medium set or 15 to 18 minutes for hard set. Let cool in the pan for 5 minutes. Run a butter knife around the edges of each nest a few times to loosen completely, then use the knife to lift them out of the tin. Serve sprinkled with chives.
Friday, December 6, 2013
Eggnog
Hey, all you eggnog lovers out there! Take a moment, go to your refrigerators and pull out your carton of eggnog. Look at the ingredients. You'll probably see a bunch of additives, additions to make the eggnog thicker...unfortunately, many of these things were produced in a lab. I don't know about you, but I don't want to eat that stuff, or drink it for that matter. But I love eggnog. And making eggnog lattes is like a Christmas tradition! So, I decided to make my own eggnog this year. I turned to good old AB (Alton Brown) to see what he had to say on the subject. He offers two different recipes, one that is cooked and one that is not. I opted for the non-cooked one as it seems a bit more traditional, and I whipped up a batch tonight. (For those of you concerned about uncooked eggs, you could go for the cooked version.) Words can't really describe how good this eggnog is. It is, hands down, the best eggnog I've ever had, and it has me wondering why it took me this many years to make my own. Best of all, it has only the ingredients I put in it and nothing produced in a lab. So, put down that carton, pick up a whisk and make your own eggnog...you won't regret it!!
Eggnog (inspired by Alton Brown)
Ingredients:
4 egg yolks
1/3 cup sugar, plus 1 tablespoon
1 & 3/4 cups nonfat milk
1/4 cup 1/2 & 1/2
1 cup heavy cream
1 teaspoon freshly grated nutmeg
4 egg whites
1. In the bowl of a stand mixer, beat the egg yolks until they lighten in color. Gradually add the 1/3 cup sugar and continue to beat until it is completely dissolved. Add the milk, cream and nutmeg and stir to combine.
2. Place the egg whites in the bowl of a stand mixer and beat to soft peaks. With the mixer still running gradually add the 1 tablespoon of sugar and beat until stiff peaks form.
3. Whisk the egg whites into the mixture. Chill and serve.
Eggnog (inspired by Alton Brown)
Ingredients:
4 egg yolks
1/3 cup sugar, plus 1 tablespoon
1 & 3/4 cups nonfat milk
1/4 cup 1/2 & 1/2
1 cup heavy cream
1 teaspoon freshly grated nutmeg
4 egg whites
1. In the bowl of a stand mixer, beat the egg yolks until they lighten in color. Gradually add the 1/3 cup sugar and continue to beat until it is completely dissolved. Add the milk, cream and nutmeg and stir to combine.
2. Place the egg whites in the bowl of a stand mixer and beat to soft peaks. With the mixer still running gradually add the 1 tablespoon of sugar and beat until stiff peaks form.
3. Whisk the egg whites into the mixture. Chill and serve.
Sunday, July 28, 2013
Bacon, Caramelized Onion and Gruyere Quiche
I've taken a new job, and it's a little farther from home than I'm used to. Thank goodness for public transportation that allows me to ride the train every day to work. This does put me home a little later than I'm used to, so I've decided that the weekends will be my main cooking days for the week. Today, I got busy making a lot of different things, but I knew I wanted to make a quiche. My family loves frittatas, quiches and the like. I had some peppered bacon, Gruyere cheese and a couple of onions, so I went to work blending these three ingredients into a lovely quiche that we can eat during the week for breakfast, lunch or dinner. Normally, I make a quick pastry tart dough when I make my quiches, as it's easy to whip up, press into a pan and go. That's what I would recommend. But I also had some Trader Joe's pie crusts in my freezer, so I thawed one this morning while I was at church, and by the time I came home, it was ready to roll out and press into my pie shell. So, whatever way you go will work out fine. This recipe is based on Alton Brown's Refrigerator Pie recipe.
Bacon, Caramelized Onion and Gruyere Quiche
Ingredients:
1 pie crust or pastry dough recipe
2 medium onions, sliced
2 tbs butter
6-8 rashers of bacon, sliced into lardons (little strips) and cooked
1/2 - 3/4 cup grated Gruyere cheese
2 large or extra large eggs
1 cup half-n-half (or you could sub out lower fat milk for part of this and up the eggs to 3)
Pinch of freshly grated nutmeg
Salt
1. Preheat oven to 350 degrees.
2. In a large pan over low heat, melt the butter. Add the onions and let caramelize for about 20 minutes. Remember to keep the heat low. I add a little salt to allow the natural sugars from the onions to come out. Stir occasionally.
3. Meanwhile, cook up the lardons of bacon until they are crisp. Drain on a paper towel-lined plate. **Better make a few extra to snack on while you're cooking.**
4. Grate the Gruyere cheese.
5. In a medium bowl, whisk the eggs, half-in-half and nutmeg together until combined.
6. Press the pie or pastry dough into a 9" pie pan. Put the pie pan on a half sheet pan or cookie sheet in case you have any run over. You are not going to pre-bake the pie crust.
7. Spread the bacon evenly over the bottom of the pie pan. Next, top with the caramelized onions. Top with the cheese. Then pour the egg mixture over the top.
8. Put in the oven for 35-45 minutes. Remove the pie from the oven and let rest for at least an hour before serving.
Bacon, Caramelized Onion and Gruyere Quiche
Ingredients:
1 pie crust or pastry dough recipe
2 medium onions, sliced
2 tbs butter
6-8 rashers of bacon, sliced into lardons (little strips) and cooked
1/2 - 3/4 cup grated Gruyere cheese
2 large or extra large eggs
1 cup half-n-half (or you could sub out lower fat milk for part of this and up the eggs to 3)
Pinch of freshly grated nutmeg
Salt
1. Preheat oven to 350 degrees.
2. In a large pan over low heat, melt the butter. Add the onions and let caramelize for about 20 minutes. Remember to keep the heat low. I add a little salt to allow the natural sugars from the onions to come out. Stir occasionally.
3. Meanwhile, cook up the lardons of bacon until they are crisp. Drain on a paper towel-lined plate. **Better make a few extra to snack on while you're cooking.**
4. Grate the Gruyere cheese.
5. In a medium bowl, whisk the eggs, half-in-half and nutmeg together until combined.
6. Press the pie or pastry dough into a 9" pie pan. Put the pie pan on a half sheet pan or cookie sheet in case you have any run over. You are not going to pre-bake the pie crust.
7. Spread the bacon evenly over the bottom of the pie pan. Next, top with the caramelized onions. Top with the cheese. Then pour the egg mixture over the top.
8. Put in the oven for 35-45 minutes. Remove the pie from the oven and let rest for at least an hour before serving.
Monday, November 12, 2012
Lemon Curd
There are two kinds of people in this world...those who like lemon curd and those who don't. For many, many years, I wouldn't even touch the stuff. I mean, with the name CURD, unless your British, that just sounds unappetizing. I also was not a big lemon fan as a child, so the lemon did nothing, in my mind, to redeem the curd. Now, my mother LOVES lemon curd, and I would see her put it on English muffins, or crumpets, or pretty much anything. I didn't get it.
However, as an adult, the day I dipped my spoon into my first taste of lemon curd, I was smitten. I mean, I questioned how I'd lived my life thus far without eating this exquisiteness masquerading as a simple topping for scones, ice cream or a myriad other vehicles. So, I was OVERJOYED to see that Cookie & Kate had a recipe for no-strain lemon curd (or blood orange - can't WAIT to try that!) using honey. My mom is coming to visit me in March, so I figured I needed some time to perfect a lemon curd recipe before she got here so I could make her homemade scones, lemon curd and tea! This weekend, I took my first stab at this recipe. I don't think I'll need much time perfecting as this recipe was EASY and tastes drop-dead yummy.
If you're one of those people who love lemon curd, try this recipe! You'll never buy your curd again. And if you're one of those who don't like lemon curd, try it anyway - you might just change your mind!
**Cookie & Kate suggest using Meyer lemons...I couldn't locate any right now, but when I do, I'll be sure to make it with those super sweet little gems!
Lemon Curd (via Cookie & Kate)
Ingredients:
4 tablespoons unsalted butter, cut into small pieces
1/3 cup honey
4 large egg yolks
2 large eggs
2/3 cup fresh blood orange or lemon juice (about 4-6 blood oranges or 6-8 lemons).
1 tablespoon finely grated blood orange or lemon zest
1. In a medium bowl, cream the butter and honey until fluffy.
2. Beat in the eggs slowly.
3. Pour in the fresh citrus juice, and pour the mixture into a medium-sized, non-reactive saucepan.
4. Cook over moderate (medium-low) heat, stirring constantly with a wooden spoon. Cook until the mixture has thickened and becomes jelly-like, which took about 5 to 7 minutes for me. This happens in a flash so pay attention! You really want to let it teeter on the edge of boiling, but pull the pan off the stove before it gets to a rolling boil. It’s done when your finger leaves a clear path on the back of a wooden spoon (be careful, it’s hot!).
Before it begins to thicken.
5. Immediately remove from heat and stir in the citrus zest. No straining required!
6. Pour the curd into a glass jar(s) and let it cool completely before you screw on the lid(s). Store the curd in the refrigerator.
Makes 2 cups.
Cookie & Kate leaves this note on her site for uses for citrus curds:
Suggested uses for citrus curds: Serve on honey or molasses bread, buttered toast, scones, pound cake, gingerbread, shortbread, or molasses cookies, either on its own or with a dollop of whipped cream, crème fraiche, cream cheese, vanilla ice cream or Greek yogurt (as shown). It also makes a great filling for tarts, crêpes, stuffed French toast and sandwich cookies! It would be a lovely addition to a berry parfait as well. The options are limitless!
Saturday, September 1, 2012
Cheese Souffles
Okay, I admit it, I watch Master Chef. Gordon drives me crazy with his constant use of curse words. Joe insults me (heh, heh) with his obsessive need to overly criticize someone's dish if it happens to go wrong. I don't mind Graham at all. But I watch the show to see some amazing cooking. The other night, the pressure test was souffles. I was delighted! After my success with chocolate souffles, I was eager to see Frank and Josh at work crafting their three souffles. And it inspired me to try my hand again at another round of souffles, but this time, I wanted to try cheese souffles. I made these for lunch today for the boys and me.
Nathan, who watches Master Chef with me, was HILARIOUS! When I took them out of the oven, he was all goggly-eyed and oohed and aahhed at their magnificent peaks. He asked to take the first bite, and we watched as he made a perfect circle in the center of his souffle (the way Graham does on Master Chef), pulled out a bite, eyed it a bit, and pronounced, "It looks perfect, fluffy and light." He proceeded to take a bite and then told me that it was wonderful, creamy and very cheesy. Between chuckles, I dug in myself. Yum and oh so cheesy! I actually had to stop mid-way and eat my salad because these are so rich. Another score for souffles. This recipe is a modified version of one out of my Cooking Light magazine.
Cheese Souffles
Ingredients:
1.5 tbs fine, dry breadcrumbs
3/4 cup low-fat or non-fat milk
1 tbs unsalted butter
1 tbs canola oil
1/8 cup AP flour
2 large egg yolks, at room temperature
4 large egg whites, at room temperature
Pinch of salt
1 cup grated cheddar cheese
4 - 10 oz. ramekins
1. Position rack in lower third of oven; preheat to 375 degrees. Coat 4 - 10 oz. ramekins with cooking spray (or oil). Sprinkle with enough breadcrumbs to generously coat the inside, tilting to evenly distribute; tap out excess. Place ramekins of a baking sheet.
2. Heat milk in a small saucepan over medium heat until steaming. Melt butter and oil in a medium saucepan over medium-low heat. Whisk in flour and cook, whisking, for 2 minutes. Slowly whisk in the hot milk and cook over medium-low heat, whisking until the mixture is the consistency of thick batter, 2-4 minutes. Whisk in the cheese until smooth. Transfer to a large bowl. Whisk in the egg yolks, one at a time, until incorporated.
3. Clean and dry a large mixing bowl and beaters, making sure there are no traces of oil. Beat egg whites in the bowl with an electric mixer on medium speed until foamy. Add salt; gradually increase speed to high and beat until shiny and stiff, but not dry. Do not overbeat.
4. Using a rubber spatula, stir one-third of the whites into the egg-yolk mixture to lighten it. Gently fold in the remaining egg whites just until evenly distributed. It's ok if a few white streaks remain. Spoon the batter into the prepared dishes.
5. Bake until puffed and firm to the touch, 20-24 minutes. Serve immediately.
Monday, July 30, 2012
Chocolate Souffle
You might have guessed that my Spoonbread Souffle was my warmup for trying a full-on souffle, something I've always wanted to try but never have. Part of the reason is lack of proper equipment. I don't have a 2 qt. souffle casserole, but I do have 10 oz. ramekins, thanks to Cash & Carry who had them cheap! The second part of the reason is that souffle's tend to be (for me) a little intimidating. What if it doesn't rise? What if it tastes too eggy when I don't mean for it to? What if I overcook it? But I finally bit the bullet tonight, and now I'm asking myself, what the heck was I doing waiting so long?? These are a dream, and were SUPER EASY to make. And just in case you needed more proof that the almighty egg is indeed king of all foods, the souffle is a shining example of the versatility and beauty of what a simple, humble egg can do. This recipe is courtesy of Eating Well magazine, though I substitute half-n-half for the heavy cream.
Chocolate Souffle
Ingredients:
3 tablespoons granulated sugar, divided
2 1/2 ounces semisweet or bittersweet chocolate, chopped
1 large egg, separated, plus 2 large egg whites
1 tablespoon half-n-half
1 teaspoon all-purpose flour
1/8 teaspoon ground cinnamon
1/8 teaspoon salt
Confectioners' sugar, for dusting (optional)
2 - 10 oz. ramekins
1. Position rack in center of oven; preheat to 375°F. Lightly coat two 10-ounce ramekins with cooking spray; coat the insides of each with 1 1/2 teaspoons sugar.
Place chocolate in a small microwave-safe bowl.
2. Microwave on medium, stirring every 20 seconds, until melted, 1 to 2 minutes.
3. Whisk egg yolk and cream in a medium bowl until combined. Whisk in the chocolate until smooth, then whisk in flour and cinnamon until incorporated.
Beat egg whites and salt in a medium bowl with an electric mixer on high speed until soft peaks form. Beat in the remaining 2 tablespoons sugar in four additions, until stiff, glossy peaks form.
4. Using a rubber spatula, gently fold half the beaten whites into the chocolate mixture until fairly smooth; then gently fold this combined mixture back into the remaining egg whites until no white streaks remain. Divide between the prepared ramekins and place on a baking sheet.
5. Bake until puffed and firm to the touch, 18 to 22 minutes. Dust with confectioners’ sugar, if desired. Serve immediately.
Saturday, July 28, 2012
Spoonbread Souffle
I was looking through some old cookbooks and ran across this recipe for a Southern spoonbread. I do like a good spoonbread and this one looked particularly yummy and light because it uses beaten egg whites to make it fluffy, and as you know my love affair with eggs, I was sold. This is more a spoonbread than a souffle, but it has the souffle texture that makes it light and airy, and quite delicious, I might add. Additionally, one serving (and this makes 6 servings), is a mere 169 calories! We paired ours with a salad with blueberries and walnuts. But you could serve this as a delightful side to a pot roast, roasted chicken or a pork loin.
This recipe comes courtesy of the Simply the Best All American Weight Watchers cookbook.
Spoonbread Souffle
Ingredients:
1 cup fresh or thawed frozen corn kernels
2 cups non-fat milk
1/2 cup stone-ground white cornmeal
2 tbs unsalted butter
1/2 tsp salt
Freshly ground pepper, to taste
3 large eggs, separated
1.5 tsp baking powder
1. Puree the corn and 1/4 cup of the milk in a blender or a food processor. Place the remaining milk in a large saucepan and bring to a boil. Reduce the heat and gradually whisk in the cornmeal. Cook, stirring occasionally, until thick, about 5 minutes. Stir in the pureed corn, butter, 1/4 tsp of the salt and the pepper. Transfer the mixture to a large bowl and set aside to cool for 10 minutes.
This is the consistency you are hoping for...
2. Preheat the oven to 375 degrees. Spray a shallow 2-quart baking dish (I used a glass brownie pan) with nonstick spray and place in the oven while preheating.
3. With an electric mixer on high speed, beat the egg white and the remaining 1/4 tsp of salt in a medium bowl until stiff peaks form. Stir in the yolks and baking powder into the cornmeal mixture. Fold in the whites. (Remember that the point of the egg whites is to incorporate air into this dish, so use a rubber spatula and fold in the whites. Click the link to see how to fold.)
This is what the batter looks like with the whites folded in...
4. Remove the baking dish from the oven. Pour the mixture into the dish. Bake until the spoonbread is puffed and browned, 35-40 minutes. Serve warm.
Finished product...
Wednesday, May 9, 2012
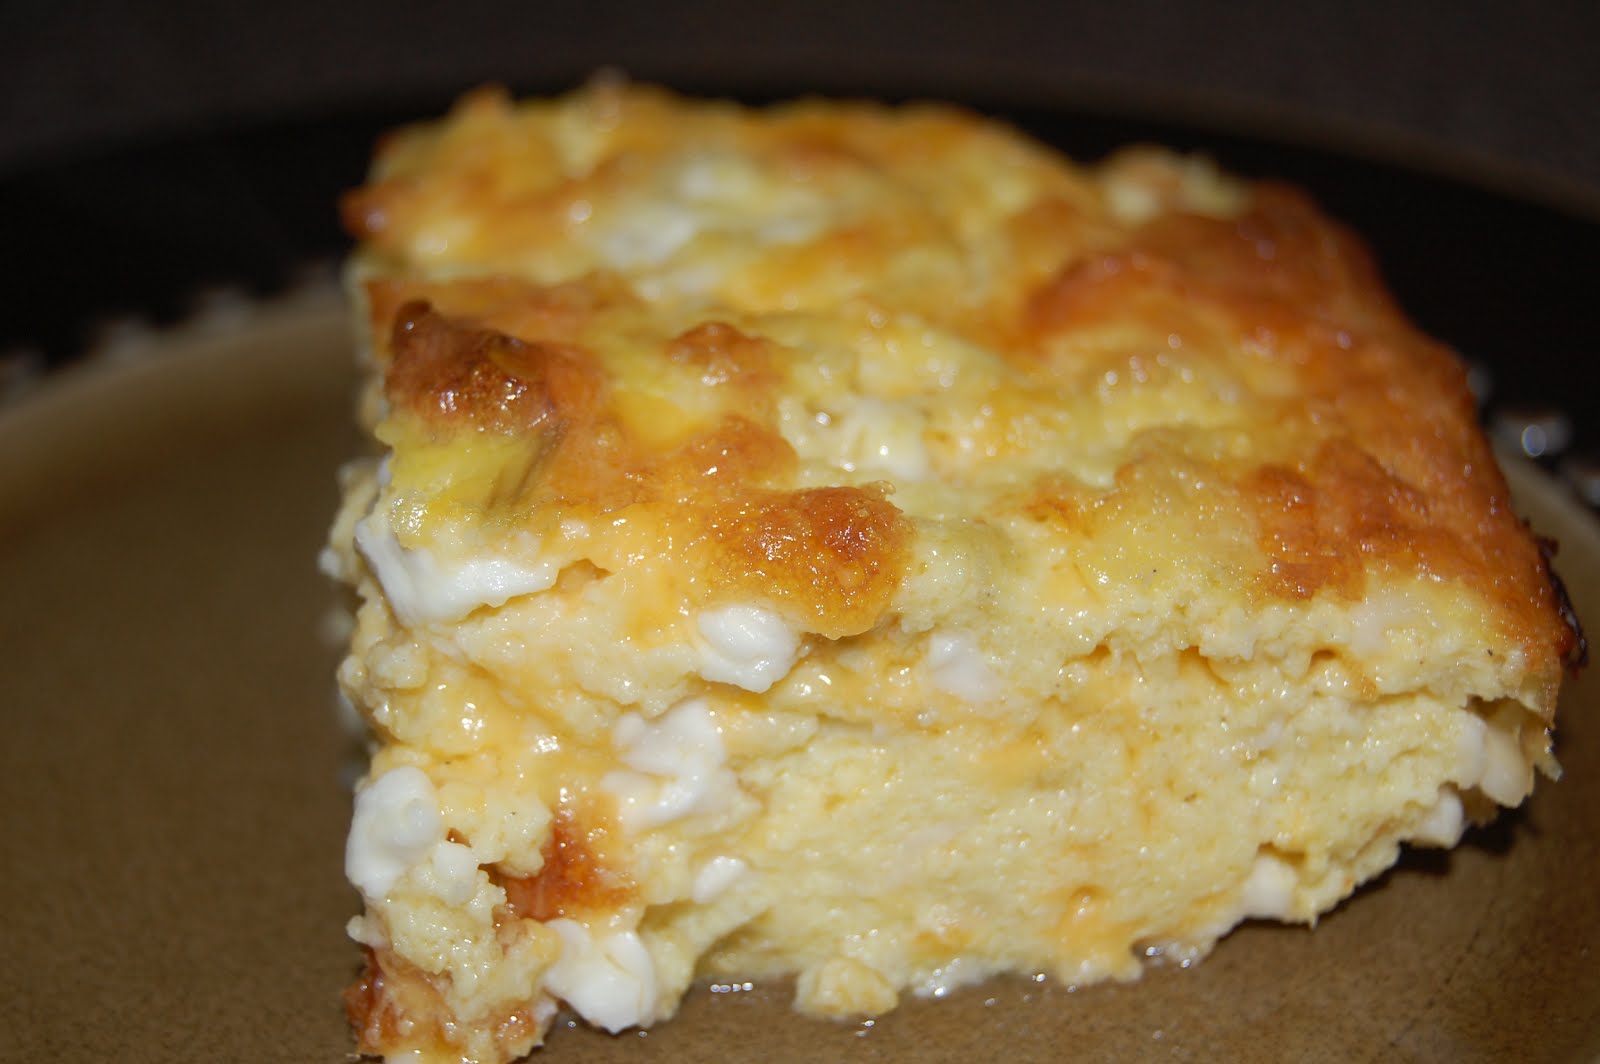
Chile Cheese Egg Casserole
My mom's husband, Jack, sent me this fabulous recipe a while back, and I've been meaning to make it, but I haven't gotten around to buying the cottage cheese. Today, I finally purchased some, only to find that I needed marscapone cheese also! I didn't want to head back to the store, and in this recipe, the marscapone would add only richness, not really the creaminess it's known for, so I knew I could whip up some homemade ricotta cheese as a substitute, so that's what I did. Want to see how I did that? It's so easy...click here. So, I'm writing up this recipe with ricotta cheese, but you could use marscapone cheese, too, if you have it.
As an egg lover, I knew this dish would be a hit, but the chiles add a wonderful spiciness! I really enjoyed this dish, as Jack knew I would. My family also gobbled it right up, asking for seconds, which I gladly handed out, after they finished their salads! **Note: I made this as a 1/2 recipe in an 8X8-inch dish, but you could easily double the below recipe and make it in a 9X13-inch dish.
Chile Cheese Egg Casserole
Ingredients:
1/4 cup butter
5 eggs
1 egg white
1/4 cup flour
1/2 tsp baking powder
1 (8 oz) can green chiles
2 cups cottage cheese
1/4 ricotta cheese
1/2 lb shredded cheese (cheddar or Monterey Jack)
Salt and Pepper to taste
1. Preheat oven to 400 degrees.
2. Place butter in an 8X8-inch baking dish. Place pan in oven until butter is melted. Pour half the melted butter into a dish and set aside.
3. Beat eggs and egg whites lightly in a large bowl. Stir in flour, baking powder, chiles, all cheeses, salt and pepper. Mix well. Pour egg mixture into pan. Top with reserved butter. Bake for 15 minutes at 400 degrees. Then turn down to 350 degrees and cook for 35-40 minutes or until set.
Yummy!
I do believe the original recipe is from the Jonas' brothers' mom, who made it for her boys growing up.
Tuesday, May 8, 2012
Spinach Salad with Warm Bacon Dressing
One of my favorite salads is a spinach salad with bacon, hard-boiled egg, mushrooms and a warm dressing made from the bacon drippings. I mean, what's not to love??? Normally, this would have thinly sliced red onion in it, but I was out, so today, no onion. This is another Alton Brown recipe, and it was easy peasy to make.
Spinach Salad with Warm Bacon Dressing via Alton Brown
Ingredients:
8 ounces young spinach
2 large eggs
8 pieces thick-sliced bacon, chopped
3 tablespoons red wine vinegar
1 teaspoon sugar
1/2 teaspoon Dijon mustard
Kosher salt and freshly ground black pepper
4 large white mushrooms, sliced
1. Remove the stems from the spinach (I don't remove my stems - I kinda like them) and wash, drain and pat dry thoroughly. Place into a large mixing bowl and set aside.
2. Hard boil your eggs. Fill a pot with water, bring to a boil on the stove. Add 1 tbs of salt. Gently add the eggs into the water, without cracking them (I use a spider to do this). Cook for 10-12 minutes. Immediately remove from the boiling water and add to a bowl of ice water. When cool, remove the eggs and peel off the shell. Slice each egg into 8 pieces and set aside.
3. While the eggs are cooking, fry the bacon and remove to a paper towel to drain, reserving 3 tablespoons of the rendered fat. Crumble the bacon and set aside.
4. Transfer the fat to a small saucepan set over low heat and whisk in the red wine vinegar, sugar and Dijon mustard. Season with a small pinch each of kosher salt and black pepper.
5. Add the mushrooms and the sliced onion to the spinach and toss. Add the dressing and bacon and toss to combine. Divide the spinach between 4 plates or bowls and evenly divide the egg among them. Season with pepper, as desired. Serve immediately.
Wednesday, April 4, 2012
Chicken Sausage, Egg and Cheese Frittata
This morning, I wanted to make a quick but delicious breakfast to use up some of the WONDERFUL chicken eggs Andy brings home from co-workers who raise chickens. I immediately thought of a frittata. I had some chicken breakfast sausage that I got from Trader Joe's that I had already cooked up in anticipation of breakfast. I simply chopped it up into pieces and grated some cheese. The rest is simple! See below. Additionally, one slice of this frittata (1/8th of the whole thing) is only around 222 calories! Amazing!
Chicken Sausage, Egg and Cheese Frittata
Ingredients:
1 dozen large eggs
1 tsp butter
1/4 cup non-fat milk or half-n-half (I was out of half-n-half)
1/2 cup shredded cheddar cheese
3 tbs shredded Parmesan cheese
12 links chicken breakfast sausage, cut into small pieces
Salt and pepper
1. Preheat the broiler. In a large bowl, crack the eggs, add the milk, salt and pepper and beat with a fork or whisk until thoroughly mixed.
2. Heat a large non-stick, oven-proof skillet over medium-high heat. Add the butter to the skillet. Pour the eggs into the skillet. As the eggs start to set up, take a rubber spatula and run it from the outer edge of the skillet toward the center, pulling in toward the center the semi-cooked portion and allowing the soft, runny portion of the eggs to move to the outer edges. Do this for about 3-4 minutes until the frittata starts to really set up.
3. Add the chicken sausage all over the top of the frittata and then top with the cheese, being sure to evenly spread all the way to the edges. Remove from heat and transfer to the oven. Broil the frittata for 3-5 minutes until the top has completely set. You don't want to overcook this, so don't keep in the oven longer than 5 minutes. Remove from the oven and let sit for 5 minutes to rest. Cut into 8 equal portions and serve immediately.
Monday, March 26, 2012
Leek and Bacon Tart
This tart was the hit of our St. Patrick's Day festivities. I must admit, however, that I cheated a little. The recipe for the tart dough in my Irish cookbook didn't look quite as good as my tried and true French Plain Pastry Dough recipe that I use for almost everything. This is Laura Calder's recipe that I've posted before. So, I admit it, I used a French recipe for the tart crust, but I'm glad I did. It's so darn good. The rest, however, is Irish.
Plain Pastry Dough (Laura Calder's Recipe)
Ingredients:
1.5 cups AP flour
1/4 tsp salt
7 tbs chilled unsalted butter, cut into pieces
4-5 tbs ice-cold water, more if needed
(This fits a 9-10 inch tart shell.)
1. Preheat the oven to 375 degrees. Combine the flour, salt and butter in a food processor. Pulse until you see the butter start to make little balls. (About 6-8 pulses.)
2. Add the water and pulse until a dough forms. It will not be a perfect round ball, but you'll see it come together. Don't over-process. Remove from the processor and pat into a disk. The dough will be neither sticky nor dry.
3. Put on a floured surface and roll out to fit your tart shell. Line with parchment paper and fill with baking beans. Bake blind for 20 minutes. Remove from oven. Remove the beans and parchment paper. Fill with tart ingredients.
Leek and Bacon Tart
Ingredients:
8 oz bacon, diced
4 leeks, sliced
6 eggs
1/2 cup cream cheese
1 tbs mild mustard
1/2 cup cheese
pinch of cayenne pepper
Salt and ground black pepper
1. Preheat oven to 425 degrees. Cook the bacon in a hot pan until crisp. Remove bacon from pan. Add leeks to bacon fat and cook for 15-20 minutes over low-medium heat until soft. Remove from heat and combine with the bacon. In a bowl, beat the eggs, cream cheese, mustard, cayenne pepper and seasoning together. Add to the leaks and bacon.
2. Pour filling into tart shell. Top with shredded cheese. Bake for 30 minutes or until golden.
Friday, December 30, 2011
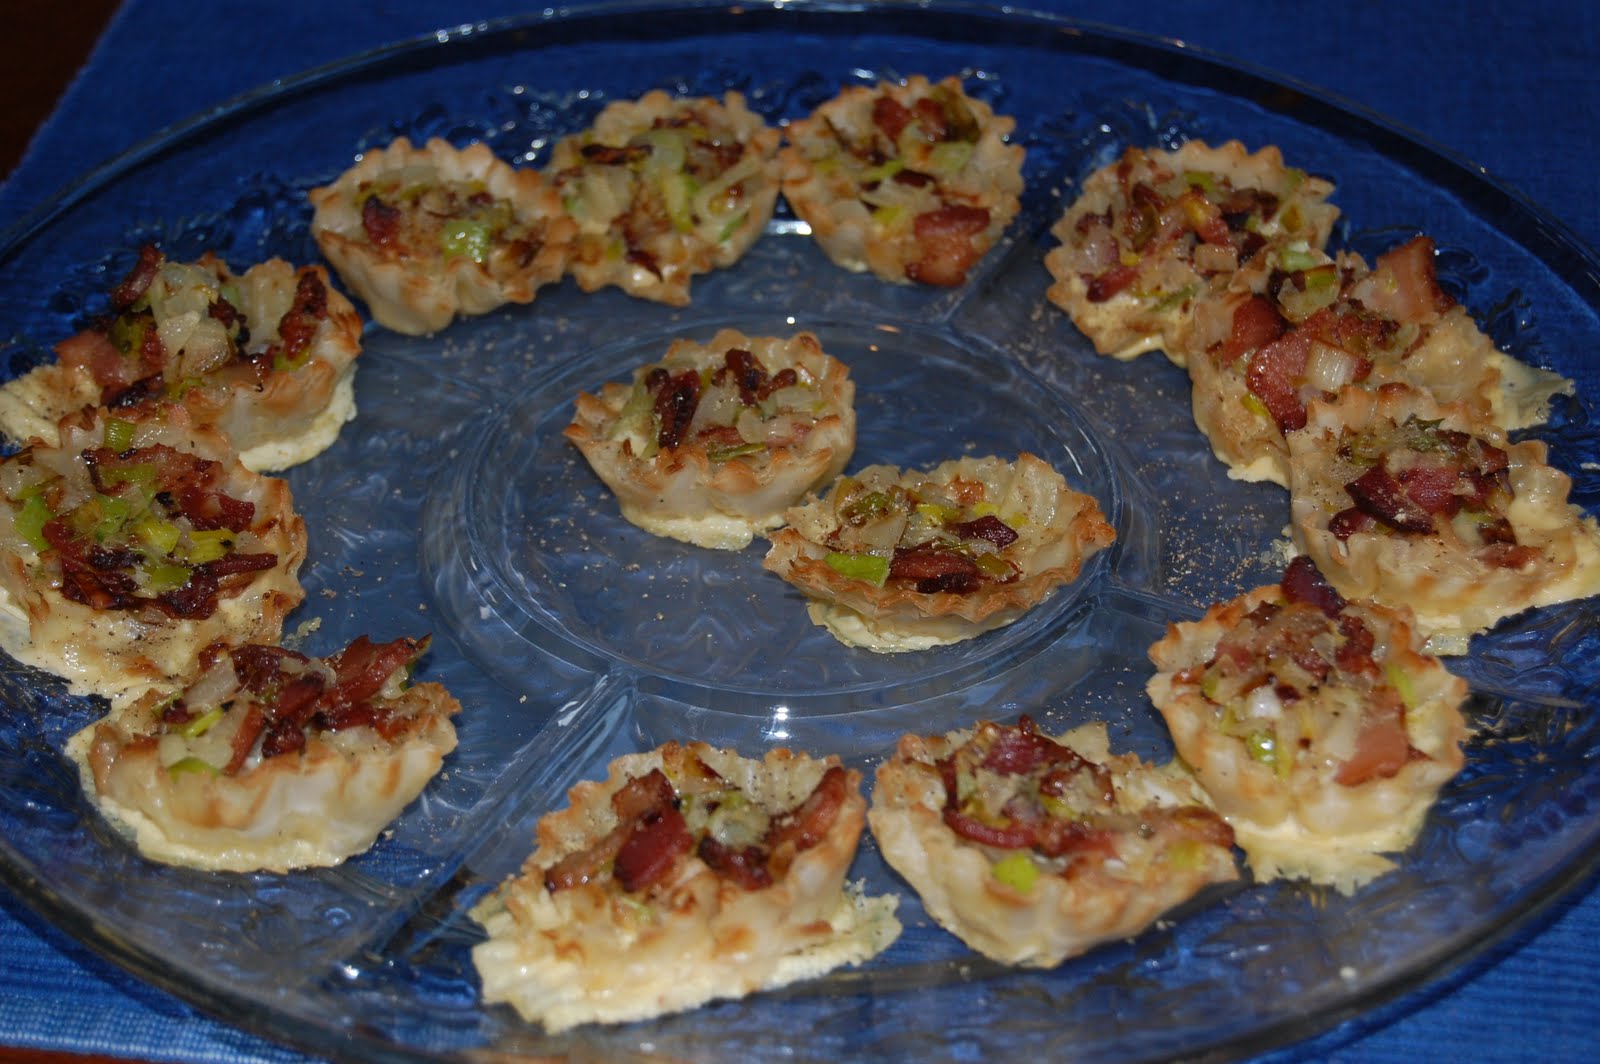
Bacon, Leek and Onion Tartlets
Tomorrow night, we're heading over to a friend's house to ring in the New Year!! We're bringing dessert (the super moist chocolate cake), and some fun snacks to chomp on as the night progresses. I've rediscovered my Cat Cora cookbook called Cooking From the Hip. While looking through it, I found this recipe for these Onion and Leek Tartlets that looked amazing. I had all the ingredients on hand, so I decided to make these for tomorrow night. I added bacon to mine, because everything is better with bacon. Am I right? Boy, did they turn out yummy! I was supposed to be bringing 15 of them tomorrow night, but let's just say that only 13 will be making the trip. :)
These were super fast and easy to make. And way better tasting than the ones you buy in the frozen section of the grocery store. I highly encourage you trying to make these.
Leek and Onion Tartlets
Ingredients:
1 tbs unsalted butter
1/2 cup finely chopped well-cleaned leeks (white and light green parts only)
1/2 cup finely chopped onion
1 large egg, beaten
1/2 cup light cream (I used half-n-half)
4 slices bacon, cooked and crumbled (my addition)
1/4 tsp kosher salt
1/4 tsp black pepper
1/4 tsp grated nutmeg (fresh please)
30 prebaked frozen miniature phyllo shells (you get these in the frozen section); not thawed
**Note, I only had one package, but I made the same filling and just really filled my tartlets up. But the above recipe would certainly be enough for 30 mini shells.
1. Place a rack in the middle of the oven and preheat the oven to 350 degrees.
2. In a large skillet over medium-low heat, melt the butter. Add the leeks and onion and stir constantly. Cook until soft, 8-10 minutes. Meanwhile, cook the bacon in another pan until crispy. Remove the bacon and the leeks and onions from heat and set aside to cool.
3. In a small bowl, whisk the egg, cream, salt, pepper and nutmeg. Stir the cooled onion and bacon mixture into the egg mixture. Divide among the tartlet shells. Place the tarts on a baking sheet and bake until the custard sets, 10-15 minutes. **Mine took about 17 minutes because they were so full.
4. Serve the tartlets warm or at room temperature.
Saturday, September 3, 2011
Poached Eggs over Beans
I know what your thinking...what? It does sound gross to the ear, but let me tell you something...poached eggs over beans has got to be one of my most favorite meals ever. Talk about comfort food...bear with me and read this out. If you're brave, you'll even try this one day, and trust me on this one, you WILL NOT regret it. Delightful.
Poached Eggs over Beans
Ingredients:
1 can cannellini beans (white beans) with liquid
1 half purple onion, chopped finely
Salt and pepper
1 tbs Worcestershire sauce
2 eggs
1 tbs vinegar
1 English muffin
Grapeseed oil (or Olive oil)
1. In a large saute pan over medium high heat, add about 1 tbs oil. When warm, add the onions and cook until translucent. Add the beans and stir. Bring to a boil. Reduce heat. Add salt and pepper to taste. Mash some of the beans and stir. Add the Worcestershire sauce and stir. Cook over low heat for 10 minutes.
2. Meanwhile, heat a pot of water (about 3-4 inches of water) over medium heat. Add 1 tbs vinegar (any kind will do) to the water. Crack the eggs into separate dishes (one egg for each dish.) When the water starts to bubble, gently lower the eggs into the water. The vinegar will cause the egg to basically coagulate and you'll see the white spread out and then sort of gather around the yolk. Cook until the whites are set and the yolk is still soft (a couple of minutes). Gently remove the eggs with a slotted spoon or a spider, and put into a warmed pot of water (off the stove). Put the lid on and let sit for up to 15 minutes.
3. Toast your English muffin. When it is toasted, scoop 1/4 cup of the bean mixture onto each side of the muffin and top with a poached egg. Repeat with the other side of the muffin. Dig in by breaking the yolk in half over the English muffin and beans (see picture above). The richness of the yolk will break apart over the beans and the muffin, and they will soak up the decadent liquid.
I'm telling you, this is filling and fabulous, and the PERFECT after-run lunch, which is why I made it today. Yum.
Tuesday, August 30, 2011
Leek and Ham Quiche
I stayed home today with a severe rumbly tummy. We have tons of food in the fridge right now (chili, pulled pork, etc.), but nothing that soothes a rumbly tummy. So, I decided to make a quiche using Laura Calder's pastry dough that I typically use in a tart. It is so easy to make and it was quite tasty.
Leek and Ham Quiche
Ingredients:
1 Plain Pastry Dough (see recipe below)
1 large leek, cleaned and sliced
4 oz. ham, diced
1/4 cup non-fat milk
1/4 cup sour cream
2-3 oz. fresh mozzarella cheese
Salt and Pepper
Butter
5 eggs
Chives (for garnish)
1. Preheat the oven to 400 degrees. Roll the pastry dough out and press into a tart pan. Poke with a fork several times. Pre-bake for 10 minutes in the oven. Remove and let cool.
2. In a saute pan, add a little butter to coat the bottom of the pan. Add leeks and slowly saute until they are just starting to caramelize. Add the ham. Cook low and slow for 10 minutes or so until the ham and leeks are caramelized and gorgeous. Set aside to cool.
3. In a separate bowl, whisk the eggs, salt and pepper, sour cream and milk until combined. (If you have half and half or whipping cream, skip the milk and sour cream and use about 1/2 cup of the cream instead - I was out.)
4. Add the leek and ham mixture to the custard and mix well. Pour into the prepared tart shell. Tear the fresh mozzarella into pieces and dot all over the egg mixture.
5. Put in 400 degree oven for 30 minutes. It will be brown and golden when it is cooked and a toothpick will come out clean. Top with chopped chives and slice.
Plain Pastry Dough (Laura Calder's Recipe)
Ingredients:
1.5 cups AP flour
1/4 tsp salt
7 tbs chilled unsalted butter, cut into pieces
4-5 tbs ice-cold water, more if needed
1. Combine the flour, salt and butter in a food processor. Pulse until you see the butter start to make little balls. (About 6-8 pulses.)
2. Add the water and pulse until a dough forms. It will not be a perfect round ball, but you'll see it come together. Don't over-process. Remove from the processor and pat into a disk. The dough will be neither sticky nor dry.
3. Put on a floured surface and roll out to fit your tart shell.
Subscribe to:
Posts (Atom)